The Build
- Macey VanDenMeerendonk
- Mar 22, 2022
- 4 min read

Overall, the build process was pretty quick. My dad wanted most of the project done before Wisconsin winter temperatures set in, so we got to work, within the first few days of owning my van, gutting it and cleaning it.
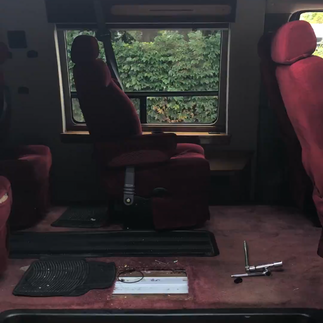
First, we took out the seats, which were held down by rusted bolts and hid
remnants of the seven children that this van toted around as its previous owners. The task turned out to take more elbow grease than initially thought, but eventually the seats were out and what was left was dirty mauve carpet, a Chuck E. Cheese I.D. card, lollipop sticks, and 17 cents. Once we ripped up the carpet and cleaned the metal floor, the blank canvas showed us the possibility of it all.


Next was insulation. We covered the spots where rust had eaten the floor with sheets of metal, and laid down pink insulation board in the grooves. After a layer of reflectix, down went plywood. I found a nice laminate floating floor at the Restore in town and that went in next. The new floor was the first touch of a finished look and was a very exciting step.


Outlining with tape for cabinets, a bed, and a bench were the next steps.

Measuring and modifying was a continuous part of this process. At this stage I was buying appliances and items that would soon inhabit these spaces, so having them to measure out was important. My fridge, porta potti, and water jugs all had to fit inside something, so when we found cabinets we had to find items that fit in them. At this stage I was also buying my vent fan, solar panels, and electrical panel which was also being measured out to all have its place.
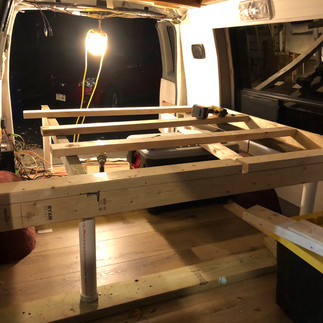
The bed was its own adventure. Lets just say I was a little indecisive of the length and height even after my dad had measured and built it to what I originally wanted. I wanted enough height to it that my garage area (the storage space under my bed, accessible from the back doors) to fit totes and items on top of them. But I also couldn't have it too high causing little head room when sitting on the bed. We built it high but then my dad convinced me to bring the bed height down and that's what we went with. Needless to say, my dad was not too happy with me that day...
But totes fit and my head doesn't hit the ceiling of my van, so it all worked out for the best!
Fun Fact: Part of the bed frame was a hand-me-down from my uncle who had built it years ago for his own van travels!


Next came putting up wall paneling, which took quite a lot of convincing for my

dad to do. But even he agrees now that it was a very good decision. I learned how to use a table and jig saw, along with a nail gun. Next came painting the cabinets a sage green color, painting the front boards of the bed an off white color, and putting a wood sealant on my wood countertops.

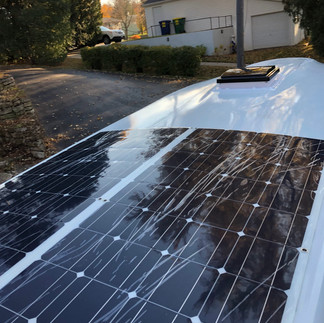
On a sunnyish and warmish day in November, my dad and I installed the solar panels and the vent fan on the roof. The vent fan went in first, and cutting a big square out of my roof made me nervous and excited. Once we started there would be no going back! Luckily all went well, and before I knew it I had a skylight for a few minutes. I placed double sided VHB tape around the edges of the cut out area and then placed the vent fan in the space. We finished it off by screwing in some screws and caulking the edges and the tops of the screws. Next came the solar panels. After cleaning off the roof, we used the VHB tape, doubling it on top of each other to create some open space between the panel and roof, and secured it to the roof. The space between the panel and roof is to have airflow so water isn't trapped and makes the panels more aerodynamic when driving.


My electrical system was set up by my uncle, a professional electrician (side note: I lucked out in the talented and knowledgeable department when it comes to family members helping me with big projects.) He wired everything up so that I have AC and DC outlets for my fridge and for when I run off my batteries or off an external source. We put in internal lights and one outside above my side doors and eventually I had a camper van with working lights, vent fan, and fridge!
Once the big things were in (or on top of) the van, then came lots of little projects. My blackout curtains, pillows, and bench cushion were made by my aunt, yet another talented family member making this dream possible. I put up Velcro for side door curtains and made back window covers out of reflectix and leftover black fabric. I hung up pictures to make it more homey. Fun Fact: The first thing I bought for my van, months before even buying my van, was a print of St. Mary Lake in Glacier National Park that I bought at a gift shop on one of my visits last summer.
So, after months of hard work, a test road trip to Maine, fixing up whatever wasn't working or hadn't held up on that trip, it is done and ready to go. This post is obviously a summary of everything it took to get it to this point, but I can go more in-depth on certain areas of the build if anyone is interested in hearing more about it.


I'm very excited to hit the road and eager to see how it all goes.
Thank you for reading along!
\


Comments